Oct 16, 2012

Kite-Surfing ~ Cape Town

Kite Surfing is big in South Africa. I mean, on a good day, you could find in excess of 50-100 surfers occupying the waters of Blouberg, Sunset Beach and Big Bay  in Cape Town, South AFrica. Ther are other parts of the Cape like, Langebaan and more around the other side too, but this seems to be the better area to hit the waters.
 
What an exhilirating experience it must be to put on your wetsuit, inflate your kite and fit the harness. Once the preparation is done, you've had your training and feel brave enough to head out, it can only be amazing.
 
Well, since I don't have the kite-surfing equipment, I still love watching these guys head out with their wind-filled kites to venture the cold waters of the Atlantic ocean. To feel the strength of the South-Wester that bellows accross the beach and sea allowing then to almost fly, in a sense. I can imagine myself, one day, splashing accorss these waters, tearing through the crests of the waves, soaring to new heights and landing again as graceful as possible back on the water's surface.
 
Most Saturdays, there's even a school that will help you to get out there, safely and confidently.
Below are some of the images from a recent day at the beach, watching, shooting, enjoying.
 
Some, do lose it, a little.

The remains of the shipwreck that is an attraction in Blouberg, slowly dissapearing into the sea.

Always such a great spectacle to watch these guys getting out and having this much fun.

Tearing a wave, getting a little air.

There's always a few learners amidst the more experience.

It's even great for couples!

Looks like a business man, yet, he's loving the thrill and the ride.

Getting some really big air!

Sometimes, taking a breather, isn't a bad thing...

On-lookers aren't plenty for some reason, but there are a few.

Trying new things, once you've mastered the basics.

Oct 12, 2012

Special Effects

Hey everybody!
 
So, I've been asked numerous times on how I get this effect. Well, I was inspired by a technique called the "Dragon Effect" as the linked video will show you. This, is my own variation of this "effect". It's still a bit of work, just like most of the youtube clips will explain to you.
 
Me, I think I've followed most of the steps, but, still doing it my way... I guess I have this thing about following rules... I use them as a guide.
Two more examples at the end of my story.
 
Your initial image should at least look good to start with. This example taken in the middle of the day is a good platform to work with, but not exactly the best.
 
Time to start putting this onion together, one layer at a time.
 
This guy was neglected by his decade long employers and left behind in a small town that is also neglected.
Please note that I do all of this in the fantastic Photoshop CS5 and hope you will understand my tutorial here as I don't go into details. I don't show clips of settings, screen dumps or any of those that you see in other tutorials. I just tell you what I did and how I did it. I will however try to give you as much detail as I can remember.
(I'm glad I saved the .psd file so that I could dismantle it and give a brief on how-in-the-hell I did this.)
 
Right, first thing I did was to shift the shadow/highlights drastically.
(Image -> Asjustments -> Shadow/Highlights)
By shifting these sliders, you can tweak the levels until you find yorself with quite a nice balance between lifted shadows and darkened highlights.
 
 
Then a quick copy of the layer (Ctrl -J Win/Cmnd J Mac), which gets some Gaussian Blur thrown at it (Filter -> Blur -> Gaussian Blur). This is to wipe out any freaky looking ghosting and edge halo's that are caused by the shadow/highlight procedure. There are other ways, but this is what I did. Oh yes, don't forget to now ERASE the subject so that only the background is blurred (this can be achieved in various ways, such as using quick select too, magnetic lasso, or just erasing). I used a combo of quick select and eraser.
 
 
 Ok, cool... So you've noticed a MAJOR saturation explosion, don't worry, we'll get to that. Before that (and this is why I'm not phased by the saturation) I add yet another layer. This layer gets desaturated (Ctrl+shift+U), then more shadow/highlights, then contrasted and finally, the layer filter is set to "Soft Light". Don't really notice it below? Probably because I shifted the fill and opacity just a tad...

 
Again, duplicated that same desaturated layer and gave it a hint of gaussian blur (less than half of the first blur used for the background) and the the fill and opacity brought back up to 100%.
 
 
Now, it's starting to look good and, as you'll notice, the saturation is slowly reducing...
Next steps are "the painter's steps" where I painstakingly sit with different size brushes of black and white and multiple layers (don't get intimidated, this is optional and can be done in different easy ways). Background get first priority... Remember your selection? It should still be available (Select -> reselect), if not, select again the same way you did for the blurred bachground. Cool?
 
Right, inverse this selection so that you now have the background selected and not your subject. Paint with brush, or use the paint bucket... either, or...
Oh, then set the layer to soft light. Background's looking cool, but still a bit of work.

 
Duplicate that layer, use a (reasonable sized) feathered eraser to trim around your subject so that you get a bit of a glow and nice rich, dark bacground, just like below.
This layer will get quite a heavy gaussian blur to blend it in nicely.
 
 
Okay, now the face, this is what can take the most time.
Another layer to the onion, set to soft light (again, sigh...) and this time, very small, feathered brushes will be used. Why? Because, stop asking questions.
This is to work on the details in the face, to accentuate the creases and "character lines" in his face, to make them stand out more.
There is another way, a photocopy layer, whites removed, blurred, but it isn't as effective as being selective and means a ton more erasing... I tried that route... it can be effective, but is just so time consuming.

 
Okay, the next two steps are basically, the same... okay, they are...
New layer, painted bucket black, erase the centre with large, very large feathered eraser with opacity set to around um, 20%. Then it's case if erasing from the centre outwards. Yeah, to create a vignette.
 
 
Duplicate that layer, erase a little more to have a lesser vignette. Play with these until desired effect.
Please note: They ARE optional, but work for me.
 
 
Okay... now it's time to deal with that saturation (which you could probably see, has been changing with each layer added) by using the new adjustment layer tool... selecting saturation and adjusting the master slider. You can, however also opt for selective colour saturation by clicking on the drop down box that says, Master... I just toned down the entire colour spectrum altogether.
 
 
Finally, I added my signature and then saved it.
(okay, I might have tweaked the  brightness once more after)
 
 
That's it, as easy as that.
Do enjoy, let me know if there anything you'd like to know.
 
Okay, two more examples.
 
This one, I managed to get it better, practice...
 
 
the first one I did, this was done using the photocopy layer story I mentioned earlier.


Oct 9, 2012

Travel Part One


I’ve been thinking about life among other things and have come to the conclusion that I am not a person who likes to sit in an office and pound away on a keyboard…

 
Me, I love the outdoors, I love to see country sides, landscapes and seascapes. I love to meet interesting people on their travels around our beautiful country. Why can I not do it then? I think I should! I came to this realisation on my recent trip with my best friend to Mossel Bay.

We had no choice but to stay at a backpackers due to budget constraints and found it to be quite enjoyable. I mean, accommodation is cheap, people are relaxed and friendly and there’s always something interesting happening somewhere that doesn’t cost an arm or a leg to do. So, that is the best way to get around South Africa, or any country for that matter. Sure, there’s that little thing of communal bathrooms and kitchen and if the budget is really tight, you share a room too! Come on, don’t be anti-social now…  
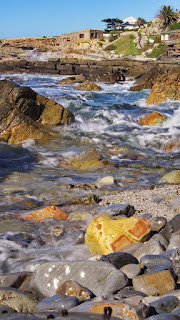
Rock pool, created from the beating of the waves and rough tides, Dana Bay didn't present much for me, but then again, I wasn't really feeling up to doing any deep searching.
Some colourful holiday homes for the fortunate few. Great l ittle spot just minutes outside Mossel Bay
2nd Beach, Dana Bay, 20 minutes from Mossel Bay.

Holiday spot just a few minutes outside Mossel Bay


Nature Reserve outside Calvinia

Old derelict roadside stall.
You know, it’s not always about getting to point B as quickly as possible, there’s also that thing of taking in the country side around you. Stopping to stretch the legs every so often is not a bad thing at all… 
A "road works" stop-n-go presented this goled gem in the late afternoon.
The sense of freedom as you drive, wondering what lies ahead.
The spectacular view of driving through the mountain passes of Western Cape.
A barn we spotted thanks to "road works". I loved the contrasting colours of the storm clouds in the distance with the warm sun shining onto the barn and surrounding fields.

 
Beauty In The Storm... This was spotted whilst returning to Cape Town, as taken without any editing, besides to resize for web purposes. Words cannot describe the sense of space, seeing the light in the storm. I risked getting my camera wet for this shot, but I think it was worth it.


Hotel in Hermanus has a great sea view with access to a rocky beach below.
The view from the rocky side of Hermanus Beach looking up to the tourist spots.
 

The beauty of Hermanus
  
These images are just a small part of what South Africa has to offer…
Spotted this whale swimming at The Point, Mossel Bay.

 
Calvinia, a town of neglect as this image shows. This old building doesn't seem like it trades anymore. Been there on two seperate occasions and it was still closed.
 
 These two chaps are just two of the people that still reside in Calvinia. On the left, an ex-convict who spent enough years (as he put it) in a cell on Robben Island, right, just a friendly chap who travelled the Cape with "the whites" until they left him behind in Calvinia.


The view from a look-out at VanRhyn's Pass that borders Western and Northern Cape.

Sep 7, 2012

The Moss Family

You know, I spend allot of time with these crazy folk... and I love them to bits.
 
There is never a dull moment, never an oportunity to miss. I find myself hauling out the camera at the best of times... well, actually, when I have it with me...
On the occasions that I do have it with me and we take a stroll, or pop down to the beach, or wherever, I usually end up with something good. They have two amazingly photogenic daughters!
 
Here, we have a nice lazy day, in a park just round the corner from their place.
Dad, being dad, mom chilling out in the sun as the two kids have some time together...
 
Mom: Leanne
Dad: Victor
Daugher: Kayla
Baby: Luna
 
 
Here's Luna getting curious as to what it is I'm doing and what this is in my hands.
 
 
Kayla loved the playground, climbing and sliding...
She really is becoming a beautiful young lady.
 
 
When she's not sliding or climbing, she's having fun with her hula-hoop...
Just love the wild hair in this one!
 
 
Okay... so Kayla has decided to go climbing again... Luna now wants to knoow how this hoop thing works...
 
 
Kids do take allot out of a person, this much I see... I mean, look at the parents...
Being lazy while the kids play and I run behind them...
 
 
I recently acquired a flash for my camera and have put it to the test... a little touch up to sort out the background and we can see a lovely image appear.

 
I went to a Sony demo of their new cameras at Intaka Island and they popped in to say hi...
Little Luna had this flower between her fingers and when the "awww" started, I knew, snap it up!

 
 A day of beer, sun and sea at Blue Peter can lead to some interesting photos too!
Here's Luna enjoying the view. The white of the walls works great as a reflector spreading the light wonderfully...
"Uncle Collin, look at the sea!"

 
Exciting stuff... for a toddler...

 
Kayla, being the energetic one, couldn't just sit on the lawns of Blue Peter, she had to get out and play... burn that energy. Here's her making sure the 'coast' is clear before hitting the downhill...
 
 
She's incredibly beautiful... even after an ice-cream and the evidence still on her lips.

 
Can see her mind is wondering... where' the next adventure...


Mom and dad, showing their love for each other... 

 
Luna's little boots...

 
 Leanne and Luna on the grass whilst Kayla returns from grinding the sidewalks...

 
Stay tuned, I'm sure there will be more to come from this mad family...