Ok, upon a request from a friend, I'm posting this up, slightly (well, very) delayed.
I took this photo some time back and on camera it looked good until I got home and loaded it onto my pc. Oh, the shock, the horror! The sky looked good but the foreground was so dark and hard to distinguish what was what.
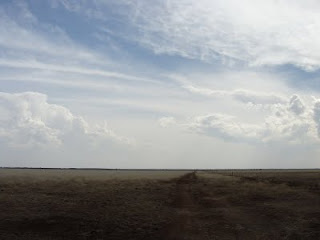 First thing I did was use my image viewer, in this case ACDSee 9, to adjust the shadows and highlights. Once I'd done that I could see the potential and possibility of recovering the image and making something worthwhile of it...
 So, I loaded it into Photoshop CS2 and began to play around. I soon realised that I would have to work the sky and foreground in separate layers to create a nice balance between the two. So, I first ran the shadow/highlights in CS2 this time, not using the ACDSee version. After that, I duplicated the image layer and then hid it (by clicking on the little eye) so I could tackle the foreground. First thing was to adjust colours (selective colour) and then adjust brightness/contrast before desaturating it a tad to tone down the colours. Once I was happy with all the work I'd done, I selected the layers including the original image and then, with right-click, merged all together into the layer so that I can get to work with the sky.
The sky needed a different amount level of processing. So, for this I ran selective colour to adjust the cyan, blue and white to the desired effect. Of course contrast/brightness was used very subtly before running levels and another round of selective colour. Once I was again satisfied with the end result, I again merged all the layers into the image layer.
Now I have two completely different looking images of the same picture posted above but layering over each other. Time to erase...
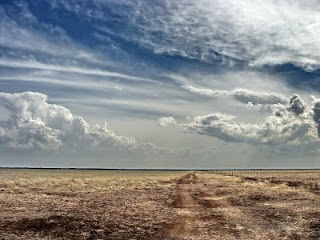
Using my erase tool I set about erasing the land from the top layer. I use a spray type brush for my eraser that erases all in the center of it's brush but fades to the sides allowing room for errors. As I got closer to the horizon, I had to reduce the size of the brush so as to not over erase into the sky. An alternative to this would be to use the magnetic select tool )but isn't as much fun for me) and then select and delete. So, once I had my sky trimmed properly, I made the bottom layer visible again allowing me to see the difference my processing work has made.
Well, many are happy with the end results.
 Hope you enjoyed another interesting insight and tip. This will be followed with more soon.
 In between all the trees, roads and little of anything else, I spotted one of many old neglected houses...
  They too had little roads leading into the forests.
 The guest lodge I stayed at had a pretty cool pool.
  Just outside Nelspruit, the sky began to clear up.
 Taken amongst the hills and valleys of Mpumalanga.
 This Giraffe and Zebra were spotted along the side of the road, behind fencing of course on a game farm just outside Nelsruit.
 Up the hills and back into the contry side.


 Misty morning in Moolman, a tiny place not even spotted on a map, but 15 minutes from Piet Retief.


 Nature's sculpturing is phenominal.


