Showing posts with label fantasy. Show all posts

May 19, 2011

My First Big Wedding - What an Experience!

So, in mid 2010, I was asked if I wouldn’t mind shooting a wedding in 2011, at the time the answer was a definite yes. I did not expect that in the time leading up to the wedding things would change so much. Needless to say, time drew closer and I no longer had a camera (mine was traded to a new owner, without consent from me, yes, I was a victim of crime). The stress of the commitment was unbearable. I mean a wedding photographer with no camera is unheard of. I had planned to own my very first DLSR, but that failed to materialize due to some unforeseen circumstances.

Well, time got closer still… then, my prayers were answered, by a generous and giving man, Mr. Brian Cheyne, in the dying times of planning, weeks before the travels to the wedding, he came to my aid. I could not believe what was happening here! A man whom I have never met in person, to me still quite the stranger, was offering to loan me his equipment. First thoughts were “what’s the catch”, there’s always a catch… strangely, there was none. None, this was new territory for me. I mean, there’s always a catch, always a sneaky little something, somewhere. Well, true to his word, there was no catch.

So, we arrived in Pretoria after the 16 hour drive from Cape Town, little sleep and unpacking to still be done. I got some rest in, 2 hours or so, then off to meet the man who saved my bacon. Upon arrival, there, on the table, was a backpack, stuffed with all the goodies I would need. 2 camera bodies (Canon 10D and 50D), and lenses, oh man, lenses. Everything I would need (and then some) for the wedding. You sir, are a true hero!

Ah, but wait! I have to learn how to use all this equipment, the wedding was less than 24 hours away! I’ve never used an attached flash, nor detachable lenses, come on, this is new territory to me! Anyways, after some fidgeting and button pushing, I started to get the hang of all this new fun stuff. I can understand why he loves photography so much. So, late to bed, with an early rise, to continue adapting to the cameras and lenses before the rush to the groom’s place. To shoot him, the bride had somebody with her. Then from the groom, to the venue, to shoot the bride a bit as well at the venue, then shoot the venue and finally… the wedding!!! I went into overdrive! I shot all angles, I shot anything that caught my eye, but never lost focus on the wedding and it’s most important guests… the Bride and Groom!

As you know, nothing flows smoothly, no matter how much planning you have done, there’s always a few surprises. Well, I had my fair share, but to me, these were all learning curves… an all new experience. Needless to say, I tip my hat to the pros who do this nearly every weekend. my legs just aren’t fit enough for all the crouching, squatting, running, bobbing and weaving and many other things I can’t think of right now to get that one shot that could make the wedding album complete.

Well, did the wedding, saw my good friends again, had a ball and then packed the bags and returned home. Now, so far in my mind (and the minds of many) everything was sorted and the editing could begin. I got stuck into editing to realize, but there’s images missing! Oh the horror!!! Worst thing you can do for the wedding is lose some vital images. I mean, I’m playing with the couple and their family’s memories here! Panic stations! A few calls and check here and there, I’d misplaced a memory card, it was still in Pretoria. It took some time to get those images here, I mean these are of the rings, the families and the whole group together! These, were some of the most important images. Well, all’s done and as you can read by this post, 2 months late, but complete nonetheless. Hopefully, if I do a wedding again, it won’t take this long for the couple to get their winning photos.

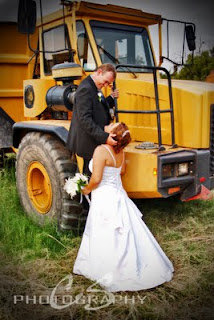
So, without any further ado, I introduce to you, the bride and groom… Mr. and Mrs. Engelbrecht… and a few images from the wedding.

-In no particular order-

Collin Scott photography, wedding, editsCollin Scott photography, wedding, editsCollin Scott photography, wedding, edits Collin Scott photography, wedding, edits Collin Scott photography, wedding, editsCollin Scott photography, wedding, editsCollin Scott photography, wedding, editsCollin Scott photography, wedding, edits Collin Scott photography, wedding, edits

Nov 21, 2010

Creating Fantasy

So I've been a little quiet on the editing side of this blog. Wording the how-to's has been my mental block. But good news, some interesting reading without imaghes on the steps to follow...
---o0o---
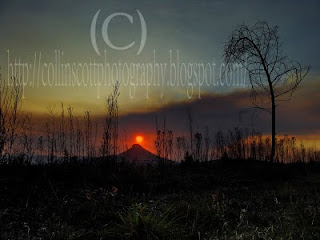
So, I was driving the Longtom Pass, Mpumalanga from Sabie to Lydenburg. It was along these lovely winding turns and bends that I watched as the sun set. Fortunate for me, winding these roads and having many a place to appreciate, I spotted this gem. A once off, a must-stop, rolled passed, quickly reversed and bounded out the car. Surveyed the area to see what sort of composition I could get out of this and well... after snapping here and there, crouching, stretching, tilting and eventually kneeling did I get the "luck shot" (only took me around a dozen attempts). Sun was perfectly positioned, The khaki weeds and this fire stricken tree all sitting uh, I mean, standing just right, allowing a channel through leaving the peak of the mountain and the sun well, near perfect.
Um, before I continue, the clouds you see, they're not clouds. There was in fact a huge fire just north of this location and it was churning smoke in masses. Oh man, this created such a perfect scene. Gave it drama, mood and a great breaker between the remains of the day and the beginning of night... Shot at 1/250 sec exposure, aperture F8 and ISO 100 while exposure bias remained 0. Yeah, off camera looks good... but I like rich, bold colours, it's my thing so you know what's going to happen next, right? Right.

So, in Photoshop(R) I just played around with the contrast/brightness and the usual shadow/highlights, like always. Am I getting predictable? Hope not... So with a few added layers, I adjusted the sky, Toned the hot-spot known as the sun and adjusts the curves just a pinch.

---o0o---
Yeah, so now it's nice, but if you've read some of my other posts, you'll know, nice isn't enough. I WANT MORE!! MWAHAHAHAAAaaaa... erm... okay, Dr. Evil laugh doesn't work for me either.
Anyways, back to task. Here goes...
1: Lighten the foreground... New (soft) layer, painted with white where needed. Remember to trim the excess if need be to add to the feel. You'll get the hang of it of you practice enough.
2: Darken the sky... What for? Because I said so, this is my pic and that's what I've done :). Okay, seriously, it was done to add to the mood of the image (these whit and black layers also double as dodge and burn). So, another soft light layer, painted black over the areas I wanted darker. Remember again, trim off the excess, there will be overflow (I did this to keep the outer area darker than the center closer to the sun to help draw the eye into the image). Don't use 100% eraser, keep it to around 30%, this way you can still get a nice blend and effect.
3: Start adding objects... For this one, I added a crow from a failed attempt at getting a BIF (Bird In Flight), positioned just right can make or break an image. Furtuantely for me, this one had blue sky all around so cutting it out was easy. Painted it black to get the silhouette. I duplicated the layer, blured that layer and set it to soft light. This creats a sense of OOF (Out Of Focus) and adds to the sense of motion. Now add another soft light layer and get your white paint ready, set to around 30-40% opacity. I did this to accentuate certain parts of the bird just slightly, creating depth and perspective.
4: Continue addining objects... Don't overkill on things added... if you have a good image, you don't want to destroy it altogether, just make it interesting. The planet/moon/anything else you might think it is was diffilultly easy. No, seriously, to get the angle, placement and lighting right, can be a challenge. What I did here, was to add a new layer, get a big white solid brush and smack it down, like a stamp, boom. Now I have a white dot on my image (removeable layer of course) which needed lots of tweaking. Step one, a soft brush eraser, around the same size as the paint spot. Cool, getting there... now I have a nice white crest sort of thing that fades, pretty much like the moon would... so, with this eraser (now reduced drastically in size and opacity) I dabbed the remains here and there (with different size brushes) until I'd creted some nice uh, let's call them craters... but, it's STILL WHITE!! That's just not going to do! Easy fix, eyedropper tool, picked an orange from my sunset and back to paint. I added a new layer again, soft light of course (don't worry about the white spot, getting back to that) and spread a soft brush of orange over the white, remeber to erase the excess, it looks funny if you don't. Awesome, looks good. Back to the previous layer again for final adjustments. This time, I played with the master opacity and master fill opacity to get the blend done. So that's it. Done.
Oh, wait!
5: Lens Flair... Good point, I nearly forgot. Okay, I duplicated the backround layer, added the lens flair (try make sure you get the position right or it will look out of sorts and make no sense). Once I had that done, it seemed odd, ah yes, eraser again, to trim it off the foreground some, the reason for that was so I could reduce the opacity and still keep the foreground. This also helped to make the flairs seem more distant than they should... adds mistery amd intrigue.
So, I'm done, the results are below. I hope I got you interested, if not, sorry... ask me and I'll go into my archives and try fill in the blanks.
---o0o---
Share this on Twitter, or Facebook, tell your friends and get the word out on cool tricks.