Oct 19, 2009

Artistic Editing 1

Okay, so you have a nice photo taken. But, it's just a photo and you want to wow viewers with a different look, right? Sure you do... I mean, why have normal photos that do look nice if you can add a little something to make them so much more.
So, below is a couple of examples of 'how to' make your images a little more striking when printed and framed.
This first crop of a Rose and buds is nice, great background, detail and so on. But, the colour is a little "flat" and the image isn't nearly as striking as can be. Time for it to go into Photoshop.
Okay, I duplicated the same layer twice over the original. Then I started on the original layer with some shadow/highlights (Image, Adjustments, shadow/highlight) and selective colour (Image, Adjustments, Selective Colour) to lift the colours and lighting a bit to make it stand out more.
Then, on the second layer, I used the Dream Suite plug-in to add a ghost blur effect. Then, on this layer I used my erase tool, set to about 250 and opacity of around 25, to gradually start erasing from the centre of the Rose bud so as to fade it towards the edges. I did this to keep the detail sharp in the centre of the rose but blur it out to the edges to create a dreamy look and feel. It did take a couple of attempts, but got the dream feel I was after. So, now it started to look good... but that was not enough to complete this Rose image, it was lacking something... oh yes, the third layer. I de-saturated (Image, Adjustments, Saturation) this layer (removed all the colour to black and white) and then added a strong contrast (Image, Adjustments, Brightness/Contrast) to darken the blacks more. So now I have a black and white layer over my other work. Again, the erase tool was called upon. This time with the opacity at just under 20 (can't remember exactly) and size of 600, I started to erase from the centre. With each click, I would widen my circumference until I had created a vignette look to mostly the corners of my image enhancing the focal area.
Final result below.
---o0o---
Here is another example of a similar processing style. The only difference is that instead of the vignette looking corners, I opted for a Diffused Glow blur (which basically enhances light spots and gives them their own unique hint of blur) which I then gave an opacity of 65 so it would blend more with the original image. Note: This Inca Lilly has had NO colour enhancement, shadow/highlight work or anything, except for cropping it for composition purposes.
Before ->
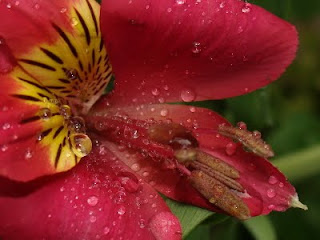
After ->
And so ends part one.
---o0o---

Sep 26, 2009

Back to Task

Okay, I lost track and was just posting pics without explaining much. I said I would post as I learn new tips n tricks. Well here's a kicker for you all.
This is the original image, slightly over exposed so colour detail is lost somewhat. Time to take it into PhotoShop.
First thing I did was to twiddle the shadow/highlights a bit to lighten shadows and darken the background a tad (under Image, Adjustments - Shadow/Highlights). Once that was sorted it was time to adjust colours with selective colour, shift the brighness/contrast to boost colour a tad more and give it very subtle saturation. Once I had colour, brightness, saturation and all that done, it was time to add to the point of focus. So, I added a blank layer and filled it with a gradient fill using the gradient tool. Set it to wide radial to darken the rim of the image and draw one's eye to the centre of focus, then made the opacity 30% so it doesn't overpower the focal point.
Then I got carried away...
I added another layer duplicating the image, added a gaussian blur of 8.6 and using my eraser, with a 300 pixel brush size set to 40% opacity, started to erase from my centre of focus outwards. Once I'd done that I got to thinking of adding yet another layer. This time I duplicated the original adjusted image and converted it to a high contrast black and white (shifting saturation all the way to the left then adding brightness/contrast and merging these into the layer) which I then also erased wider than the blurred layer. So now I have four (4) layers in total and the image is really starting to take shape. One final thing, I thought to myself, was to add a border frame for canvas print... so I went to work again. I selected a rectangle (using the rectangle select tool) and drew a rectangle, as even as possible, and then inversed my selection (Alt-S ~ inverse) to have only the border selected. I then added more Gaussian blur and with 30% opacity painted white over it. After that I boosted the exposure (Alt-I [Image]; Adjustments - Exposure) by roughly +1 to brighten the border which will then be folded over the canvas edge. The final result below...
And so ends a brief tutorial on making an image more attractive. Now go out and take pictures keeping this in mind.

Aug 10, 2009

Road Trips, South Africa ~ Part One

Right, in no particular order, some of the photos from my recent travels around the drier areas of Southern Africa. We have such a beautiful and diverse land. Please bear with me as some (well, most) of these were taken from a moving vehicle. On one side, when you travel deep Free State and Northern Cape, it's pretty much flat. Then you head more eastern side towards White River and Sabie stopping by places between, it's hilly, green and lush.
 
---o0o---

Morning trip, just before passing Witbank heading towards Nelspruit and White River...

 
Just some of the country side between Nelspruit and White River.
 
 
In the middle of nowhere... civilization exists, spotted this shopping center about an hour's drive from Douglas, but about an hour plus before Kimberly.
 
 
Crossing a single lane bridge about 20 minutes from the industrial farm town of Jan KempDorp.
 
A run down shoplet in Jan KempDorp.
 
Kimberly behind us, Jan KempDorp ahead, somehwere on this road.
 
 
Just one of Kimberly's attractions, spotted as you enter the town.
 
 
Between Bloemfontein and Kimberly, the road is flat... and straight... a road where lots of this can be seen...


Approaching Bloemfontein in the early morning mist.

Sunrise between Johannesburg and Bloemfontein... somewhere...


I am developing a greater love for my contry, South Africa. Such a diverse land, culturally and by design. South Africa, a land of many splendors I have yet to see and experience.

Jul 21, 2009

Open Pictorial - Artistic Imagery

Right, these are just for visual impact. Use of colours and processed in layers in PhotoShop. Rather than work with one layer to try and bring an image to life, I worked with 3.
---o0o---
1. Bottom layer, made very dark with very saturated colours.
2. Middle layer, Colour tones and shadows equally balanced with an opacity of around 70-75% on average to overlay the first layer.
3. Top layer, generally allot brighter, colours enhanced and brighter than the other two layers. Opacity average 60-65%.
---o0o---
Will make for great wall hangings.

Jul 15, 2009

Sunset...

Was a beautiful July afternoon, to the rest of South Africa, it's winter but not in Ballito... we were at the coast relaxing after a day of doing, well, very little besides a short trip to the beach and back. I looked up and saw the golden colours on the clouds so I jumped up grabbed my camera and went for a walk. The heart in the cloud is just coincidence, honestly... took a stranger to notice it.

Firstly, as I walked out the front door I noticed the rays peeking over the clouds between the houses, which are cropped out of this image as they spoiled the shot.

Then, as i walked half backwards up the slightly steep road to where it would be more open to take photos I kept stopping to take pictures. Oh yes, a trick I figured was to use my sunglasses as a lens filter. This helped to create lens flairs too.

As I got further up the "hill" along the road, I kept taking phots, still using my sunglasses over the lens.

Ah, the brisk walk is over... I reached my final destination. This small cluster of trees were great to shoot, and so photogenic. They posed wonderfully for me and never complained. Notice the compostion of the tree and location of the sun... a well done pfoto according to the pros. Okay, I did have to crop a little off the top and clone out a few stray twigs and stalks of grass as per their request.


The constant shifting of the clouds provided a great oportunity to get great sunset photos, I stepped back a bit more to get more of the sky in as well so you can see how the colours were changing as darkness loomed behind me.

Of course, while I was up there... I just had to snap up our accomodation, thanks to a friend who owns a small place there. This is Caledon Estates, Ballito. Thanks go out to my buddy, for walking out when he did (I never noticed him until afterwards) and providing perspective to the size of the place. Phase two of the estate is now beginning construction. Pity about the pylon and power cables in the background. I could clone them out but that would steal from the reality of the shot and the place. On the stroll back, I noticed this tree with new shoots, in July, in winter... so a sihouette shot came to mind. Pity I couldn't get a better shot, this is still a bit busy for my liking.

Landscapes and Seascapes... Exposure Shots

Adjusting shutter speeds can make for great images too. Thing is, these must be done at night, very late afternoon, or damn early morning... before coffee.

This image was taken just before 8pm, Ballito beach facing Umhlanga. 10 second exposure, aperture F3.5, ISO 100 with a focal length of 6.3mm.

This one again on 7 second shutter speed, aperture F4, focal length 14.6mm and ISO set to 100. The rock on the left looks like a sleeping croc, don't you think?

Early morning, sunrise. Aperture F8, exposure time 1.5 seconds, ISO 200 and focal lenth of a mere 6.6mm.

This time, 5 second exposure, aperture F8, ISO 100 (should have had it at 200 to prevent image burn on the horizon) and again 6.3mm focal lentgh (which as I've learned is due to the auto settings)

Now this was just playing around... preset my camera with a 10 second timer so I had time to get down there and pose... a few times. Shutter speed set to max for my camera at 30 seconds, aperture at F3.5 as it was actually quite dark and ISO at 200.

Now this is just before 6pm... aperture F8, exposure time of 15 seconds and ISO of 200.